Shift – How I rotated the world

So recently I’ve been working on a new project that involves flipping the player around in a 2D space by 90 degrees. I went through a lot of iterations trying to get this system working and wanted to outline my thought process on this system and how I got to where it is now.

Current System:

ShiftPlatformer2.gif

So my first thoughts were to rotate the world around the player, this would allow me to use the Rigidbody2D gravity to keep the player grounded where I wanted and not have to mess with other physics options. I tried this method using Transform.RotateAround() and rotated the world around the player by 90 degrees. This did cause the rotation at the desired angle how the transition was instant and was a little disorienting.


transform.RotateAround(Player.transform.position, 90f);

Now my problem is that I needed to have a transition between A and B instead of it being instant. Adding Time.deltaTime into the method did cause visible transition between the two rotations however it was only increment the rotation value to it would never stop. I messed around with Mathf.clamp to try and clamp the world rotation between two points at any given time however it didn’t work as intended.

After this a designer friend of mind ask what if I rotated the player and camera around and use my own gravity to suite. This would mean I there are less objects moving regularly on the screen so less chance of things breaking and since there are only four desired angles the player can be in, creating my own gravity would be quite simple.

How I approached this was creating a state machine that would track what direction the player was currently in. This included,


 public enum Directions
 {
down,
right,
left,
up,
 }

I then used a switch statement to track whats happening in each state and which axis the gravity is affecting the player. For Gravity im using a Vector2 and applying that to the Rigidbodies velocity which will cause it to be pushed constantly in a single direction.


switch(direction)
 {
case (Directions.down):
velocity = new Vector2(0, -gravity); 
break;

etc

}

Now that my gravity is sorted, I next needed the rotation to happen. I first created another switch statment which would be used to check which direction the player would need to rotate based on which input was pressed and which direction state the player was currently in.

e.g. Pressing Right:                                       Pressing Left

Down – Right – Up – Left – Down                 Down – Left – Up – Right – Down

I then used two Quaternions, Too and From, these would be used to Lerp the player and camera between the two rotations when the transition occurred. “From” is a snapshot of the current rotation just as the transition starts. “Too” is pre defined to be the desired rotation I want to rotate too. I then perform a standard Lerp between the two points.


float distCovered = (Time.time - start) * rotationSpeed;
float fracJourney = distCovered / jLength;
jLength = Vector3.Distance(new Vector3(from.x, from.y, from.z), new Vector3(too.x, too.y, too.z));

Vector3 result = Vector3.Lerp(from, too, fracJourney);

transform.eulerAngles = result;

This nearly did the trick. It did cause a rotation to the desired angle, however a good friend called gimble lock came into play. What happened is the transition would end in the correct rotation but it would rotate in many different directions before reaching its end point. I asked another programmer friend of mine about this problem an he suggested that I used Vectors over Quaternions and just increase or decrease the value by 90.


from = transform.rotation.eulerAngles;
too = from - new Vector3(0, 0, 90);

Using this setup I performed the same Lerp as before. This then caused the effect you sore at the start and is what my current system looks like.

We this is how I got to my current system.

Thanks for Reading.

What have I been up too lately?

Hello (potentially two people that might read this blog),

What have I been up too since I graduated from SAE Institute?

Well firstly, I was bestowed the honorary title of “Unemployed” and now have to worry about many adult things like, finding some sort of income among other things.

But what about projects (I hear no one ask), well I have been working a few things in my lots of spare time. The first thing I did was actually go back to another project I started a long time ago and try to continue it. I was a portal/transition system I was working on that was inspired by Anti-camber however it didn’t get very far and ultimately I stop as I couldn’t progress on it.

Now however, I have a piece of paper saying im smart and can actually do things, and do things I did making some improvements over the system and allowing an actual transition between two planes. (I will now go over my system and explain how it works and how I am going to improve it in the future).

Here is the current effect:

StencilandRendering

So the system has two parts to it, Stencil Shaders and Render Textures. The Render Texture is what causes the actual transition between two planes and the stencil shader is used to mask the transition and make it look like your actually moving between areas.

How they work?

Lets go over the transition first, You will need two cameras for this, One camera will render PlaneA and the other will render PlaneB.

Snap1.PNG

Next we need a render texture, I made a short script that will get both camera on the player, Create a render texture and place it on the second camera and when a function was called would move that render texture to the first camera and swap the camera references around.

Snap2.PNG

This will move the render texture between the two cameras on function call and you won’t need to keep updating the reference of the cameras themselves. (Just make a quick function to call the swap).

Should work like this:

Portals2

Transitioning through a door way is quite easy, I just use a quad. Quads are like one way walls that you use, I place on in the centre of the door and make it a trigger. I then made a quick OnTriggerEnter() function to call the camera swap when the player enters the quad.

Result:

Portals3.gif

Yeah, a transition is happening now 🙂 Next we need to mask it. Here is where the stencil shader comes in. So what is a stencil shader? a stencil shader works very similarly to a regular shader that any texture rendering material would use. The only difference is that each pixel is will be encoded with a reference value which can be used to determine what pixels will be rendered and which aren’t.

First we need two regular image effect shaders, one for the placing on object that we want to hide and only render when needed and the other will be used to revel those hidden objects.

Hide Objects:

Snip4

Revel Objects:

Snip5.PNG

What does this mean? well the stencil part is where the magic happens,

Ref – is the reference number you place into each pixel

Comp – Comparing the reference value

Pass – What happens if the Comparison passes?

we want the comparison to equal so that both object have the same reference value before anything happens. If it passes, I want to replace my current pixels with that of the other object.

adding these to materials and placing them on your planes and quad (and setting the reference value to something other then 0) will cause an effect similar to this:

Portals5.gif

(Keep in mind a few things might be wrong with yours) Issues I had were that the stencil shader would cause the camera not to render the plane you are currently on. How I solved this was to duplicate both planes and and how no stencil or layer attached to then so they just loaded normally. I know it poor in many ways but there many things I’m trying to fix and this is one of them.

After that you need to transition back. I used a similar script as the camera swap but just swapped which quad in the door was active so I didn’t have multiple colliders going off at once.

And that is my current system. Many things to keep working on and thanks for reading 🙂

Bloop Boop Critical Reflection

After working on Bloop Boop for the last 11 weeks, I have learnt a lot about myself as a team member and as a programmer. It’s good to say that I have defiantly improved my programming standards, using more advance techniques and methods to create my solutions and branching out into new and interesting forms of programming like shaders, which I have found an interest in. However did have some issues with learning and understanding other concepts and sometimes lacking the motivation to try and learn and understand them so they can be used in the future.

Firstly, as a team player I felt I preformed well overall throughout the course of development. I work diligently on my tasks, for the most part, to try and get them done on time and to a suitable standard, using Google drive and slack to check off and update people on changes I have made. I was, for the most part, available in slack while I was working for others to contact me and ask questions. Issues did arrive however when people needed to contact me on updates and work progress and I wasn’t on at the time or day which caused some uncertainty and gaps in our schedule for when tasks were complete.

I was a part of every meeting that was setup for this project and gave my opinion when needed along with suggesting changes and cuts to the game when it seemed needed. Example being the more fleshed out animations, due to the process of setting these animations up, individually changes each frame to a material and cycling those through or storing many lists of frames and trying to swap them out when needed would have taken up far to much time for a system that would have been very buggy and messy with many fixes needed after its initially made to be usable. Therefore I suggested cutting them and focusing on polishing other aspects before the gallery.

Some improvements would be,

  • Quicker response times, have notifications setup to tell me when I have questions would drastically help improve my response times and would have solved some previous issues of team members not knowing what I was working on or when I was finished.
  • Doco updating, there was a few times that I didn’t quite understand what something was or how it was meant to work and therefore had to guess and implement it that way, which is no efficient and something that I need to improve on.

In terms of being a programmer, I felt I was much more efficient in this project then I was with others. I stopped relying heavily on basic, beginner tactic’s and started thinking more in depth on creating systems and methods that can be used more openly or are just built better then previous attempts and iterations of that system. I’ve heavily removed away from if statements and focused more on Switch statements to control the flow of the code and what its affecting, using jump tables to skip repetitive and sequential checks that If statements do.

I worked on more advance systems like a splatter system, which took into consideration shaders that I had made to create the effect of paint splatter of objects. This involved me researching and learning more on shader lab, Unity’s in built shader language, and CG, which is Nvidia’s graphics shader language, and how they work. I also learn’t a lot on stencil shaders and the power that they have to create some great illusion effects.

I also worked creating the illusion of screen wrap using multiple balls and the camera varrible of .isVisible to check what was visible to the camera and what wasn’t. However there was some issues that came up. Due to me working a lot on the front end of the project, I didn’t have much time or experience working more in the back end with the game’s or Unity’s networking setup. This caused issues where I was unable to work properly for a while to compiler errors of Unity’s IAP systems not being active or imported in my particular project I had no idea how to solve it.

Others were Json and creating the level loader as I had not done many readers and parser before and had to rely on others for help developing, maintaining and updating it. However I learnt some new concepts like dictionaries. Overall a lot of the issues I had last time have been improved on, I have had less issues lately coming up with new and efficient solutions and plan on continuing to get better in the future.

Improvements that I will be making:

  • Improving my CG knowledge, this is to allow me to create better and more intricate shaders for my future projects.
  • Continue to learn new concepts in Unity C# programming


Hardware Limitations of a 3DS

As programmers, you need to be aware of the limitations of any particular platform you wish to work on. This involves understanding the hardware that is being used and how far you can push them to get the best performance possible. Other factors that need to be considered are FPS, resolution, active elements, file and application size, along with a lot more. In this blog I will be going over the limitations of developing a game on the 3DS and how its hardware and other features could affect that game’s development and performance.

Firstly I will only be covering the New 3DS, not the Original, XL or 2DS. Even though they have similar setups, there are other factors you need to consider like increased resolution, lack of 3D capability and different hardware. So lets cover some hardware,

  • Processor – 804 MHz ARM11 MPCore quad-core
  • GPU – 266 MHz DMP PICA200
  • RAM – 256 MB
  • Resolutions – Top Screen: 800×240, Bottom Screen 320x 240

So what do these mean for game development, well the 3DS isn’t all that powerful of a machine. It’s processor is a quad core so it present a decent opportunity for multi-threading but overall is fairly weak when it comes to performance. Its GPU is a PICA200 which is a Japaneses specific GPU design that’s embedded into the system and was designed for high-performance arcade systems. Has 256 mb of memory which is tiny in comparison to today’s standards. So overall not to great, however this system is not meant for high end AAA gaming but instead portable arcade games and apps.

In terms of its core limitations, its lack of RAM is a major concern as you need to be careful with what and how much data your game will cashe into the system for quicker processing. This would suggest reducing as much data information into the bits possible for cashing, data like player and enemy position are simple enough as they are an X,Y,Z coordinate (3 bits), player stats can be saved as string of numbers that can be called a processed quickly. Optimisation methods like these would need to be thought off to counter the lack of RAM in this system.

Another major limitation is its resolution but this can also be a good thing. Since the resolution is quite small it will take less processing time to render sprites, animations and other data. This means more time and effort can go into making more detailed assets and system as they would run smoother and have less of a performance hit. However caution is needed as the processor, as mentioned before, is quite weak with the smaller resolutions being a way of countering it. Have many active elements on screen at once in comparison to higher detailed assets would cause much higher processing to be needed and therefore lower the entire performance of the machine.

Its duel screens is another factor that needs to be taken into consideration, When designing a game for the 3DS you will probably think of interesting game play features that the second touch screen could be used for, however touch screens dont tend to be the fastest, processing wise, and performance needs to be considered if the feature works better on the main screen and just using a button. The 3D functionality of the system can also take a massive amount of power and processing to maintain and determining how that affects your overall performance is needed.

Another limitation is the file and application size of your game, you cannot have a massive 3oo hour long RPG on the 3DS without a better SD card used. As the base system on has four gigs of storage memory, its quite low and that can easily be taken up by a couple or semi-large arcade games and apps. Optimizing and compressing files would be suggesting for the 3Ds to lower the entire file size as small as possible for easier installation and usage.

That goes over a number of limitations that the 3Ds has.

Thanks for Reading 🙂


Security and Data Risks to Bloop Boop

Like most games, Bloop Boop is careful when it comes to its security and privacy to make sure the game runs correctly and safely and that all player data, including analytics, IAP information and Google Play details remain safe and secure to avoid breaching peoples privacy. However that wont stop people from trying to get around these systems in order to, break the game, steal personal information, modify the APK or do something else they aren’t meant to.

Some risks that can happen are,

  1. People no paying for coins – This would involve then loading the game on PC and trying to backwards engineer the game to get the source code. Then modifying how many coins they have thought code before rebuilding the game and putting it back on their phone. Methods around this would be to check how many coins hey had, before and after they load the game and seeing if there is a difference, if there is then delete the difference. Another would be check how many purchases they made and calculate how many coins they should have. However since this quite a low tier game I doubt this would happen.
  2. People trying to steal other peoples IAP details – There is always a risk of people trying to steal other peoples credit card when it comes to IAP. Since the purchase isn’t necessarily through us but instead Google Play Store and we just check things off a list it passes, the risk of this happening is quite low as they would have to go though google as we don’t save any of those details, it would be a major privacy breach if we did.
  3. Privacy statements not correct – There are many details you need to be careful on when you write your own privacy statement as it outlines what data you will be receiving from the user and using in your game. This can cause issues with people if you try to take excessive amounts of data and access from people, Pokemon GO’s first privacy statement shows this well with them gaining full access to your google account and have full reins to do what they want with it if you play their game. Actions like these can cause legal action against you and we will be certain to avoid this with only taking data we need like names and friends.
  4. EULA issues – An End User License Agreement is document that is agreed between both parties of the software. Just like the privacy statement you need to be careful with what you write to make sure you aren’t doing anything stupid with it. Stating that you gain access to profiles and all contents inside would breach privacy laws stating that you own the software and all its aspects will stop others from taking and copyrighting your game.

One account of an existing data leak would be the famous example of Value’s Half-Life 2 game leak in October of 2003. This was when A German man named Gambe sent a email to one of the employees of Value with a link inside that contained a virus. The employee click on that link and Gembe suddenly had access the the entire Half-Life 2 game source code. He then proceed to post the entire game onto the internet, causing extreme damages to the company as a whole.

Gembe then started to brag about his accomplishments to Value directly and instead of threats in return, Gabe Newell decided to offer Gembe a job as a security manager for Valve as he did such a good job of breaking into their system. Gembe accepted and went to get on the next plane to America before being stopped by German forces as there was American FBI waiting for him for when he landed as he was going to be trailed and prosecuted for breaking into their system and causing so much damage. Gembe then spent a lot of time in jail in Germany for that crime.


Splatter Effects in Bloop Boop

A part of Bloop Boop core aesthetic is in its splatter effects and bulk of the work was done thought the use of stencil shaders. The main idea around this is to have each splatter image with a stencil shader and reference number in the shader itself and have each hazard have a stencil mask shader that checks for the reference number of the splatter images. This then causes the splatters to be invisible to the camera but when the are over a hazard, the stencil shader will render the splatter pixels over the hazard pixels causing the splatter effect.

How this works is that I took a standard unity shader and added in the stencil elements. Stencil doesn’t require much in order for it to work, normally you only need a reference number “Ref”, a comparison “Comp”, what to do if the condition passes “Pass” and what does it do when it fails “Fail”.

SubShader
{
 Stencil{
 Ref[_StencilVal]
 Comp equal
 Pass keep
 Fail keep
 }


These stencil properties are placed just before the pass as it needs it to for when the condition is true or false. What these properties do are, stop the rendering of any object with the stencil shader until it is being viewed by its mask, a stencil shader that checks for a specific reference number. When the mask is over the the stencil object it then its pass condition will become true and this is where you can alter how the object is rendered. In this case I am telling it keep the pass below which is telling it render the object normally.

Stencil
{
Ref [_StencilVal]
Comp always
Pass replace
}

However there is an issue with this shader, due to how unity renders an image, it often reveals hidden detail or creates extra pieces to fill in the gaps of a texture, based on its alpha. This often causes the texture too look terrible and not what we wanted.

rend1

To solve this I started looking into Alpha Cutout and how it worked. In short, alpha cutout is used to determine how far a pixel needs to be along the alpha channel needs to be before it render, else it is cutout and doesn’t render. Since I was using a surface shader to start with, I decided to use an if statement in surface function that would turn the alpha of a pixel to 0 if it was too low.

//Properties
_Cutoff("Alpha cutoff", Range(0,1)) = 0.5

//Sub Shader
float _Cutoff;

//Surf Funtion
if (c.a < _Cutoff)
o.Alpha = 0
else
o.Alpha = c.a;

This however didn’t work and instead of wasting more time on trying to figure out why I decided to rewrite the shader from a surface to a vert/frag shader instead as I could use the discard function in the fraf funcion to not render that pixel if its alpha is to low.

//Properties
 _Cutoff("Alpha cutoff", Range(0,1)) = 0.5

//SubShader
float _Cutoff;

//Frag Function
fixed4 frag (v2f i) : SV_Target
 {
 fixed4 col = tex2D(_MainTex, i.uv) * _Color;

 if (col.a < _Cutoff)
 discard;
 return col;
 }

what this does is check each pixel in the frag function for its alpha value, and it’s lower then the the _Cutoff value that I set then discard it and not render it. Now the image looks like this:

rend2.png

Now that the splatters and being rendered correctly, they now needed to be instantiated onto the screen. Since they need to appear on object that the bloop will hit, I decided to use OnCollisionEnter2D() to instantiate one of the splatter images at the players position whenever the bloop hits something and change the colour of the splatter to match the current bloop.

void OnCollisionEnter2D(Collision2D coll)
{
GameObject splatter = Instantiate(splat[index], transform.position, Quaternion.identity) as GameObject;
splatter.GetComponent<SpriteRenderer>().material.color = curColor;
splatter.transform.parent = coll.transform;
}

Without the shader:

without

With the shader:

with

This is the shader that I made and the processes I went thought to make it, this shader acts as are core aesthetic to the game and is easy to tweak and work with when implementing new splatter images, as its a list. One final note is that since the splatter objects are just instantiated and are an actual object on the screen with a parent, more then one hazard could pick them up, expectantly spinning objects that would rotate the splatter image and reveal it on other objects. This however was solved by someone else using some screen layering tricks to stop other hazards from seeing them.

After this was all done, the next issue was scale. On objects that are stretched and distorted, it will affect the splatter itself as it is a child of the object. This is a simple solve as I just instantiated another object with the splatter that will hold the splatter at a normal 1,1,1 scale. Then parent the holder to the object the bloop hit.

void OnCollisionEnter2D(Collision2D coll)
{
//
//extra stuff
//
GameObject splatterHolderClone = Instantiate(splatterHolder, transform.position, Quaternion.identity) as GameObject;

splatterHolderClone.transform.SetParent(coll.transform);

splatter.transform.SetParent(splatterHolderClone.transform);
}

The last major issue was changing the color of the splatter when the bloop pick’s up a power up. This was solved by creating an extra color variable in the Bloop class that would the base bloop color of that Bloop. I then get the material color of the powerup material and add that as a new color which is then temporarily used on the Bloop material.

public void UpdateColor()
{
Color sc = Color.black;
List<Powerup> powerups = PowerupHandler.GetPowerups();

foreach (Powerup p in powerups)
{
sc += p.GetComponent<Renderer>().material.color;
}

sc /= powerups.Count + 1;
sc += curBall.splatterColor;
sc.a = 1.0f;

splatterColorProper = sc;
}

That’s how I did the splatter system in Bloop Boop

color.png

Thanks for Reading 🙂


Splatter in Bloopboop

One of the major aspects about this game is its aesthetic, We wanted to have the player splash a lot of colour onto the screen as they played each level to make the game more vibrant and give a sense of satisfaction to the player as they are actively making the game more prettier. With this in mind, one of my main tasks was to create some sort of splatter system used to show the impact of the player moving the blob and hitting the various hazards in the level. This would leave a large splatter of colour on whatever the player hit with the blob, minus the player made platforms, and act as one of our major juicing methods.

I was lucky enough to have a head start with my lecture giving me a base splatter system to work with that gets the would take a render texture and paint randomly selected images onto the texture itself, at a scaled size based on the object. This was a great starting point for me and help save a lot of time creating my own. However there was many things I needed to change about it before it would be functional in our game. Firstly, world space coordinates.

This system required the corners of the object it was on to work correctly as it used to determine how big the object is. Instead of dealing this by had I decided to research and found a nice function called, renderer.bounds.min and .max. What these are, are Vector3’s of the min and max corners of an object based on the renderer attached to the object in local space. However I needed world so with more digging I found, transform.TransformPoint(). Which is used to covert local position to world, and it was with these two I created a system to automatically get the corner’s of each object on the scene.

void LocalToWorld()
 {
 //Min corner of the the object
 Vector2 min = rend.bounds.min;

 //Max corner of the object
 Vector2 max = rend.bounds.max; 

 //Min corner in world position
 Vector2 worldMin = transform.TransformPoint(min);

 //Max corner in world position
 Vector2 worldMax = transform.TransformPoint(max);

 //Appling values
 minCorner = worldMin;
 maxCorner = worldMax;
 }

Next I needed some logic on when and where the system will splat textures. With this needed to show the impact of where and what the blob hit, I needed some collision detection thought OnCollisionEnter2D(). As OnTriggerEnter2D() doesn’t store much collision data that I can use and is really only to check if something hit, plus the object would need to be a trigger and we don’t want that. With this I found a struct called ContactPoints and ContactPoints2D which stores information on where there were contacts on this object.

With this i could get the initial contact position between the blob and object and use that as my splat position, using contact.point.

void OnCollisionEnter2D(Collision2D coll)
 {
 Debug.Log("Collision");
 //First point that collided, in world space
 ContactPoint2D contact = coll.contacts[0];
 splat(new Vector3(contact.point.x, contact.point.y), 0,3, 1f);
 }

PaintWrong2

However for future use, contact.point in 2D returns a world position not a local one, so keep that in mind if going to be used later.With this, splats were appearing on the render texture but not on the actual object and this stumped me for some time and then I realised I didn’t have the render texture in the detailed Alberto section of the standard shader I was using. Now I had splats appearing on my object however they weren’t at the right positions.

The X positions of the splats were correct however the Y positions weren’t. I then looked thought the code again and realised that they system used the Z axis to determine height not Y. So after swapping those around, it help place the splats on the edges of the object and not in the centre.

 int z = (int)(remap(position.z, minCorner.y, maxCorner.y, 0, (float)renderTexture.height - 1) - splatHeight/2.0f);
to
 int z = (int)(remap(position.y, minCorner.y, maxCorner.y, 0, (float)renderTexture.height - 1) - splatHeight/2.0f);

PaintWrong1

However there is an issue, the splats are on the wrong side of the object or more specifically the splats only appear on the top side of the object.

PaintWrong3

This is one of the few issues I am still having with this system and I don’t know why. O there issues that there are, is the face that all objects need to be black in order for the colours shows and, lastly, since there is only one render texture shared between multiple objects, everything receives the splats. These are the cores issues that I am so far unable to solve and the progress made on the splatter script.

PaintWrong4.png

Thanks for readying 🙂

How to get some effective screen wrap

In my last blog I talked about how I made a basic screen wrap system for a game I am working on called BloopBoop. That screen wrap used .IsVisible to check if the ball was off screen or no and if so, then flip its X position around so it would come back onto the other side of the screen. However there was an issue with this, the player would at a minimum lose roughly a half a second of visibility to the ball as it needs to be completely off the screen, this then increased based on how slow the ball was moving. This then lead to me making a new system that counters this issues and allows for the player to see the ball at all times.

Old System:

Screenwrapbad.png

New System:

Screenwrapgood.png

So based on the diagrams you can guess that I used multiple objects to create the illusions of the ball always being on screen, when fact its a second ball that’s set a certain distance away so it starts to come onto the screen the moment the main ball starts to leave. So how is this done?

First I needed a few extra balls to act on the left and right side of the screen as the ball can go ether way. Note, the extra balls are set to kinematic so that gravity doesn’t affect them and they follow the X and Y positions of the main ball properly.

Screenwrapeditor.png

Now for the code, what do I need, well I added the extra balls into an array so I can check them later easily. I need the renderer of the main ball, I need the renderer of the other balls and I need to set a distance for the other balls to stay at.

public GameObject[] bloops;
public float distance;
private Renderer rend;
private Renderer otherRend;
void Start ()
{
rend = gameObject.GetComponent<Renderer>();
distance = Camera.main.orthographicSize * Screen.width / Screen.height * 2;
}

With distance you can use any float value you want however since this game is for mobile, I needed to adjust if for any size screen on mobiles so I took the current cameras orthographic size and multiplied it by the screen width and height twice as the orthographic size is half the size of the screen. Now the positions of the extra balls need to be set, to do this I used a for loop that and set the X and Y positions of the extra ball’s to match the main ball, with the added distance variable to the X positions.

void SetBloopPositions()
{
    Vector2 bloopPosition = transform.position;
    for (int i = 0; i &amp;amp;amp;lt; bloops.Length; i++)
    {
    //Right
    bloopPosition.x = transform.position.x + distance;
    bloopPosition.y = transform.position.y;
    bloops[0].transform.position = bloopPosition;

    //Left
    bloopPosition.x = transform.position.x - distance;
    bloopPosition.y = transform.position.y;
    bloops[1].transform.position = bloopPosition;

    bloops[i].transform.rotation = transform.rotation;
 }
}

Lastly, what happens when the main ball moves off the screen and an extra ball comes into view. Since I didn’t want new balls to be constantly spawning in and trying to swap the furthest ball around could get a little tricky. I went for a different tactic of, checking if the main ball is still visible to the camera and if not, find which one of the extra balls were and swap the mains balls positions with that visible extra ball. This is a very quick and seamless way of creating screen wrap with any need of complex code.

void SwapBloopPositions()
{
     if (!rend.isVisible)
     {
         for (int o = 0; o &amp;amp;amp;lt; bloops.Length; o++)
         {
         otherRend = bloops[o].gameObject.GetComponent&amp;amp;amp;lt;Renderer&amp;amp;amp;gt;();
         if (otherRend.isVisible)
         {
         transform.position = bloops[o].transform.position;
         }
     }
     }
}

Screenwrapeditor2.png

ScreenwrapGame1.png

and this is how I created my screen wrap. Thanks for Reading 🙂

BloopBoop and its Mechanics: Screen Wrap

One of the first things I did when developing mechanics for the mobile game BloopBoop was implementing some basic screen wrap using Unity’s inbuilt .isVisiable function. This was my first attempt at screen wrap and it went pretty well.

Goals:

  • Develop a basic screen wrap script that allows the ball to move from one side of the screen to the other when it is no longer visible and maintain its height and speed when doing so.

Starting off, I needed the ball object itself and made that a public variable in the class to I could reference it myself.

public class ScreenWrapController : MonoBehaviour {

 public GameObject ball;

Then I needed the renderer of the ball as the .isVisiable function works based on the whether the camera could see the renderer of that object or not.

public class ScreenWrapController : MonoBehaviour {

 public GameObject ball;
 private Renderer ballRenderer;

 void Start ()
 {
 //Get the renderer of the ball
 ballRenderer = ball.GetComponent&amp;amp;lt;Renderer&amp;amp;gt;();
 }

Now I created a bool function that checked if the camera could see the renderer of the ball or not using the .isVisiable function.

bool CheckBallRender()
 {
 if (ballRenderer.isVisible)
 {
 return true;
 }
 return false;
 }

Lastly I needed to move the ball whenever the ball moves off screen and is no longer being viewed by the camera. How I did this was moving the X position of the ball the opposite of what it is and it works quite well.

void ScrenWrap()
 {
 bool isVisible = CheckBallRender();

 if (!isVisible)
 {
 // Debug.Log (&amp;quot;Ball is no longer being rendered&amp;quot;);
 Vector2 newPosition = ball.transform.position; //Gets current ball position
 float horizontalVelocity = ball.GetComponent&amp;amp;lt;Rigidbody2D&amp;amp;gt;().velocity.x;
 if (horizontalVelocity != 0.0f)
 {
 newPosition.x = -Mathf.Abs(newPosition.x) * horizontalVelocity / Mathf.Abs(horizontalVelocity); //Get new X position of ball (opposite its current)
 }
 else
 {
 newPosition.x = -newPosition.x;
 }
 ball.transform.position = newPosition; //Applys the new position the ball
 }
 }

This will now cause the ball to move to the opposite side of the screen when it moves off the side of the screen. However there is an issue, the ball needs to be completely off screen before the swap happens, this means that for a second the player has no visual indication on where the ball which can cause issues when it comes to making decisions on what to do next. How I would solve this then would be to try an view the ball on both sides of the screen as it is swapping so the player would be able to view the ball 100% of the time and stop this issue from occurring.

Example:

ScreenWrap1


Thanks for Reading 🙂

Raytracer and the land of Optimization

Over the last couple of weeks my main focus on the raytracer has been to slowly decrease the processing time it took to render each sphere and overall tracing time. I have gone about this in a couple of ways, Researching data-oriented design, messed with the visual studio settings, started using openMP to pressed the processing and made an octree which all significantly help in optimising this raytracer.

Goals:

  • Decrease the processing time from 26 minutes
  • Research new methods of optimization

In the first week, I was unable to actually start coding for a time due to software issues with my visual studio and build of the raytracer. I used this time to instead do research into Data-Oriented Design (DOD). In terms of my finding and understanding of the topic now, DOD is about the data itself, what it is, how it is stored in memory and how it read and processed though your code. Instead of focusing on each individual object like you would with OOD, you break those objects down into the individual components and work with those instead along with storing the similar types together in memory.

What this does is allows for easier cache usage as it can pull in large block of similar data and not need to constantly search the memory as it can get what it needs with usually one pull, along with that it normally runs the same code over and over again which is also great cache utilisation. Other advantages involve parallelization and the ability to spread the processing across multiple cores and threads on the CPU and forms of hardware. This means you can have multiple bits of code running simultaneously instead of waiting for certain pieces to finish before others can start.

Data Oriented Design,

do_design1

For a great blog on the topic, http://gamesfromwithin.com/data-oriented-design, where they talk about the advantages of using DOD over OOD and helped me understand the topic much better with it going over the above topics along with other like modularity and creating small function specific code that clean and easy to understand along with testing and implementation. 

In terms of implementing this into the raytracer, that is still being tested on and implemented. I’m not entirely sure how I would go about it, methods I am trying to look for are lists and arrays that store Vector3 values and such, which can then be separated into their own individual lists of X, Y and Z values and instead of pointers, store these values together in memory. I can then use a for loop (a small, cache-friendly function) to loop thought these lists and get the positions of the each pixel. This can go further with adding parallelization to the mix and spreading the process across multiple cores so they can be done simultaneously.

In terms of methods that I have actually used and implemented into the raytracer. OpenMP is one of them, which is used for enabling the parallelization methods. With this I used it on the main loop of the ray tracer to spread it across the 8 cores in the CPU and therefore sped up the processing to roughly six minutes

Code:

// Primary loop through all screen pixels.
#pragma omp parallel for schedule(dynamic, 2)
for (int y = 0; y &lt; windowHeight; y++)
{

//Stuff

}

What this does is, #PRAGMA OMP enables omp into the code, PARALLEL states that it will work on as many cores there are on the CPU and FOR is used to tell the code that the next line is a for loop and should prepare for that. SCHEDULE means it is scheduling an omp loop on the code and DYNAMIC means that it will take work from the top of the priority list whenever it finishes a task instead of waiting.

Another method of optimization I used was changing various settings in the raytracers properties within visual studio. The main change was enabling the “Whole Program Optimization” to Yes which enables cross-module  optimization by delaying code generation, this change overall reduced it down a couple of seconds. Other settings I messed with where “Favor Size of Speed” to see the effect of each, where nether of them help, surprisingly, and actually decreased the speed of the raytracer by one to one and half seconds.

One of the largest changes to the code was the implementation of an Octree, Octrees are a form of spacial partitioning used to reduce the number of comparisons needed to determine and process what objects are on the scene by splitting the scene into 8 children nodes that store the ether the min or max angle of a particular area of the scene. This is then used to determine if something renderable is in that section and renderers  what is needed allowing for quicker processing times. This is great as less checks are done to determine what was part of the picture and what was background which significantly along with finding the intersect points of the spheres quicker and overall giving a great performance boost to the ray tracer. reducing it down to the now six to seven seconds of processing time.

for (int c = 0; c < 8; c++)
{
for (int s = 0; s < m_contents.size(); s++)
{
if (m_contents[s]->m_position.x - m_contents[s]->m_radius < m_children[c]->maxCorner.x &&
m_contents[s]->m_position.x + m_contents[s]->m_radius > m_children[c]->minCorner.x &&
m_contents[s]->m_position.y - m_contents[s]->m_radius < m_children[c]->maxCorner.y &&
m_contents[s]->m_position.y + m_contents[s]->m_radius > m_children[c]->minCorner.y &&
m_contents[s]->m_position.z - m_contents[s]->m_radius < m_children[c]->maxCorner.z &&
m_contents[s]->m_position.z + m_contents[s]->m_radius > m_children[c]->minCorner.z)
{
m_children[c]->add(m_contents[s]);
}
}
m_children[c]->distribute(md - 1, ms);
}
m_contents.clear();

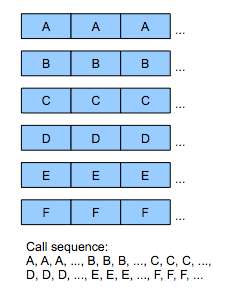
With the octree one, I did more research into other forms of optimization, however majority of what I read I was unable to actually implement due to my lacking C++ skills. The first one I looked up was SIMD operations or Symmetric Instructions and Multiple Data. This method involved performing the same instruction to multiple pieces of data simultaneously. Allowing for a reduction in processing time with the same data output processed. However there are faults with this system as multiple data sets cannot be processed by multiple instruction simultaneously. However this ray tracer, for the most part, performs the same instruction over and over again so a system like this would be quite handy.

Another method I researched was Inverse Square Root calculations and how that can be used to calculate light and reflection angles like with John Carmacks (I know he didn’t really invent it but it was easier just to say him) example with Quake and how it rendered its lightning and reflection angles with this small piece of code:

float InvSqrt (float x){
float xhalf = 0.5f*x;
int i = *(int*)&x;
i = 0x5f3759df - (i>>1);
x = *(float*)&i;
x = x*(1.5f - xhalf*x*x);
return x;

How this code work is that it uses Newton-Ralphon, which works as an approximation that starts off with a guess and is refined over iterations, slowly knocking off floating point values until it has the approximate int number it needs, the inverse square root of “i”.

To explain more deeply, “i” is the value we want to get the inverse square root of, its an int that has a initial float value. “i” is then set to “0x5f3759df” and minuses by itself, pushing all of it one bit to the right and knocking off ,at least, one of them in the process, halfing itself. This process is repeated until it has its approximate value.

However the issue with using something like this is that it requires a x86 (32) bit value instead of x64 bit number which could cause issues with more modern setups and hardware.

Overall I feel that my ray tracer optimization was a success, there could definitely be more added to it, especially all the other methods I researched  but was unable to implement. I will defiantly look more into how I could implement them for the future.

Thanks for Reading.